This article is similar to an earlier post titled Mapping Geotagged Photos that explains how to map photo locations using ArcGIS Online. This version will be more technical, but provide flexibility for what data to extract and the output format (eg. stored to a database or local file).
If you are searching for a programmatic way to create an index of photos and add them to a map, then this article is for you. Digital images contain embedded metadata called Exif data. Using Python code, you can extract this Exif data and create an index for storage in a database or a local file. The output can easily be converted to geospatial vector format for presentation in GIS or in a web map.
REMEMBER: To get GPS metadata, you must have location services enabled before capturing the photos, otherwise this will not work.
Problem Setup
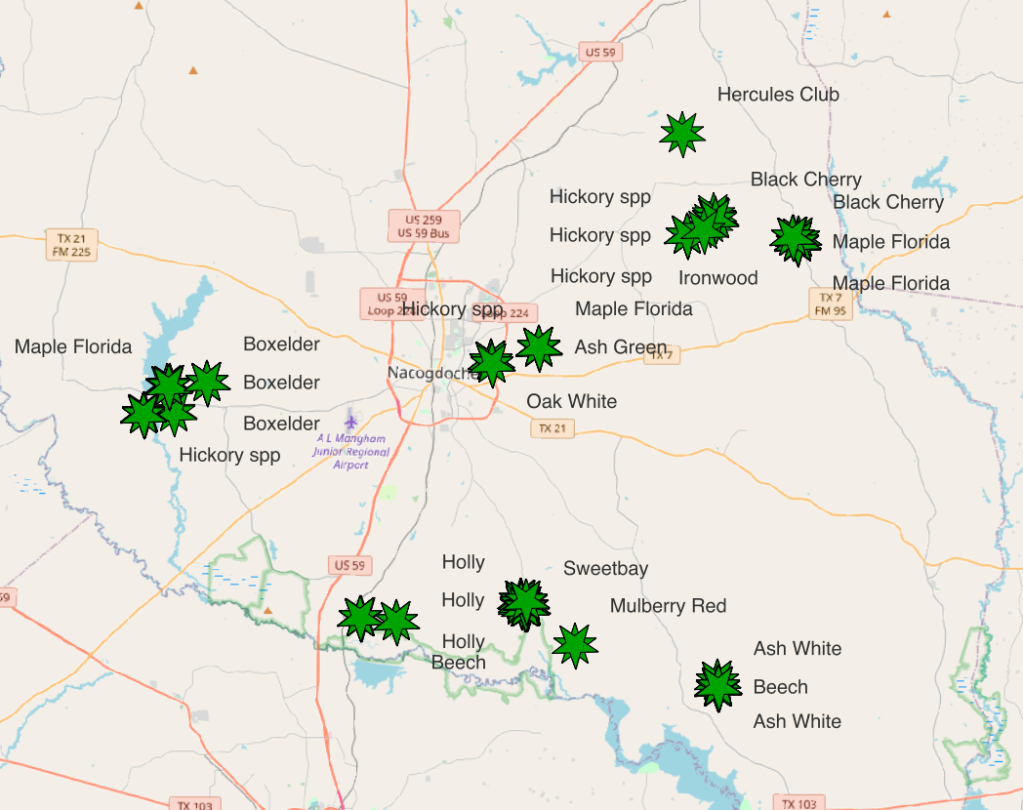
As an example, I’ll show you how I created a collection of tree photos that I captured while working on forested property that I manage. I wanted to visualize the species distribution on a map, and to keep a record of where certain trees were found.
The photos were saved on my laptop as a collection of subfolders, one for each tree species that I had identified. The following graphic shows what my folder structure looked like. This method is not limited by the number of subfolders or images that you might have as long as you have the compute resources to store and process them.
/Red Oak
    IMG_1001.jpeg
    IMG_1002.jpeg
    IMG_1003.jpeg
/White Oak
    IMG_1004.jpeg
    IMG_2001.jpeg
    IMG_4300.jpeg
/Hickory
    IMG_1005.jpeg
    IMG_1006.jpeg
Code Example
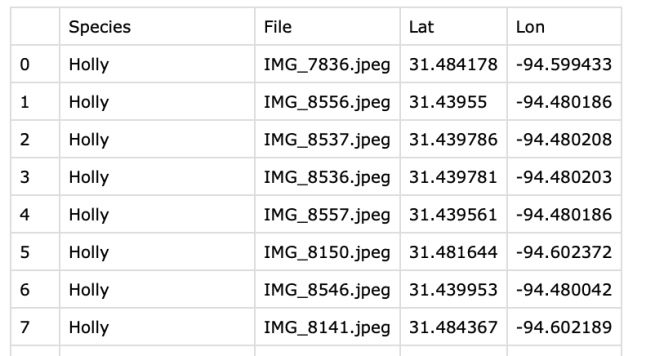
The Python code below will extract the location data from each photo and output the values to a CSV file with the first row including the following header values; Species, FileName, Latitude, and Longitude. These headers were chosen for my work, but you could include more attributes from the Exif data such as photo date and time stamps, camera and lens information, file information, and more.
A portion of the code below was adapted from a blog post I discovered by Harindra Dilshan (July 25, 2024) titled How to extract GPS data from images using Python. The code requires a function called convert_to_degrees that converts Latitude and Longitude values from degree-minute-second (DMS) format to decimal-degree (DD) format. I didn’t include the code for that function here, but Harindra provides an example in his article. Converting the Latitude/Longitude values makes it easier when adding the file to a GIS or map in later steps.
This code requires two libraries, Pandas to load and export the data as CSV, and Pillow to extract the Exif data from the photos.
import pandas as pd
from PIL import Image

directory_path="/path/to/image/folder"   # provide a valid path

# create list for storing output
data = list()

# loop through each folder
for dirpath, dirnames, filenames in os.walk(directory_path):
    print(f"Starting Directory... {dirpath}")
    species = dirpath.split('/')[-1]    # works with a unix style path
    for file in filenames:
        # get exif data
        try:
            filepath = os.path.join(dirpath, file)
            if file.split('.')[-1] == 'jpeg':
                im = Image.open(filepath)
                exif = im.getexif()
                gps_ifd = exif.get_ifd(ExifTags.IFD.GPSInfo)
                if gps_ifd:
                    lat = convert_to_degrees(gps_ifd[2])
                    lon = convert_to_degrees(gps_ifd[4])
                    northing = gps_ifd[1]
                    easting = gps_ifd[3]
                    # reformat degrees by hemisphere
                    if northing == "S":
                        lat = -lat
                    if easting == "W":
                        lon = -lon
                    # append to the output list
                    data.append([species, file, lat, lon])
                else:
                    continue
        except FileNotFoundError:
            print("Error: Image file not found.")
        except OSError as e:
             print(f"Error: Cannot open image file. {e}")
        finally:
            if 'im' in locals():
                im.close()
# create a pandas dataframe using the output list 'data' created above
df = pd.DataFrame(data, columns=['Species', 'File', 'Lat', 'Lon'])# export the dataframe to CSV format, stored in this directory
df.to_csv('tree_images_georef.csv')After all the folders and files have been loaded and indexed, I was able to create a Pandas DataFrame using my column headings and the data output. This could be written directly to a CSV file without involving the Pandas library, but it makes the code somewhat easier to read and Pandas is an excellent library for data analysis if you want to do some further processing.
The last step is to import the CSV file into GIS software for presentation and/or further analysis.
That’s all there is to it. With a few lines of Python code you now have a flexible option for creating an index of geotagged photos that can be sent to various types of output, such as a database, a local file, or a GIS map. With a little modification this method can be used for extracting information from any geotagged photo.
Featured Photo by AnimGraph Lab on Unsplash
Categories: Data Analytics Geospatial Python